MORE PROJECTS
Redesigning a legacy informational drone experience for broader accessibility
Taking a static learning experience and making it 3D & AR friendly for increasing sales
ROLE
Product Designer
COLLABORATORS
Devin Toth
Mike Sperling
Mark Higuera
Paul Passiales
SKILLS
Industrial Design
Product experience
Project management
THE OUTCOME
Savings of $40,000 per year, with 200+ estimated systems sold per quarter
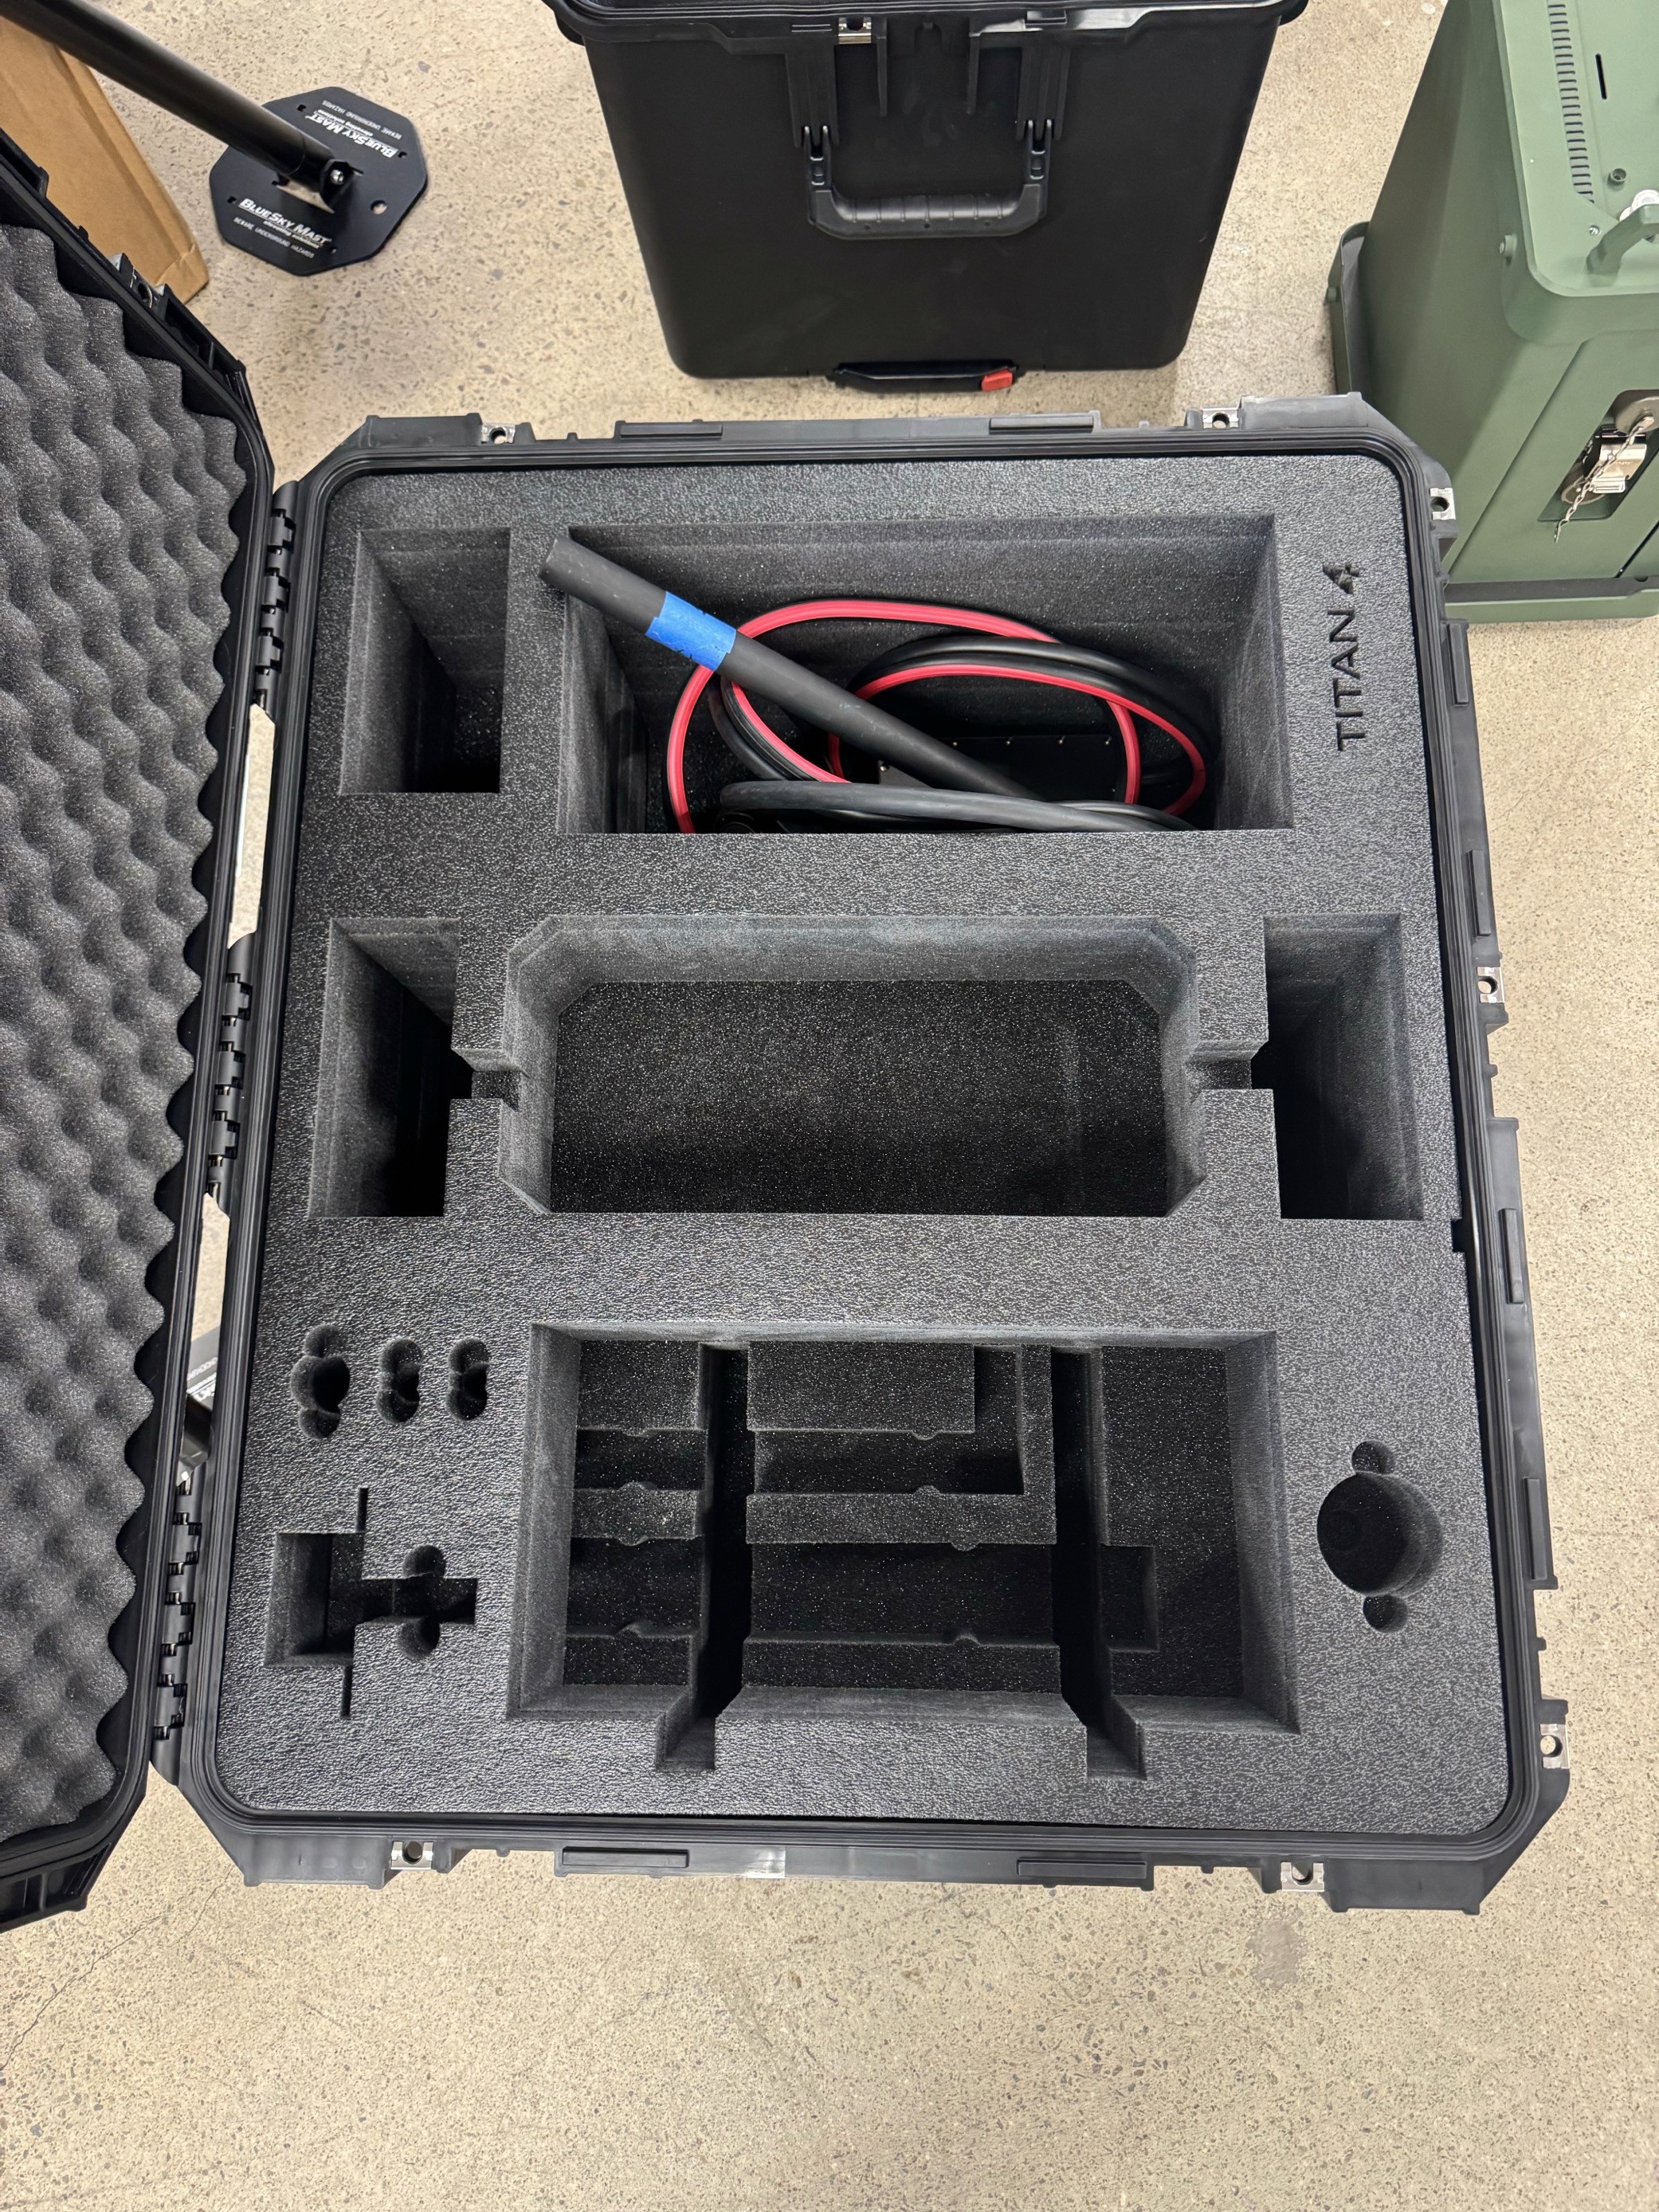
Titan 4, a first-of-its-kind product in RF capabilities and design, required custom cases to accommodate its unique accessories and size. After multiple design iterations and strategic pivots, the final case solutions enhanced the out-of-box experience and delivered $40k in cost savings per year with an estimation of quarterly sales based on previous sales.
THE CONTEXT
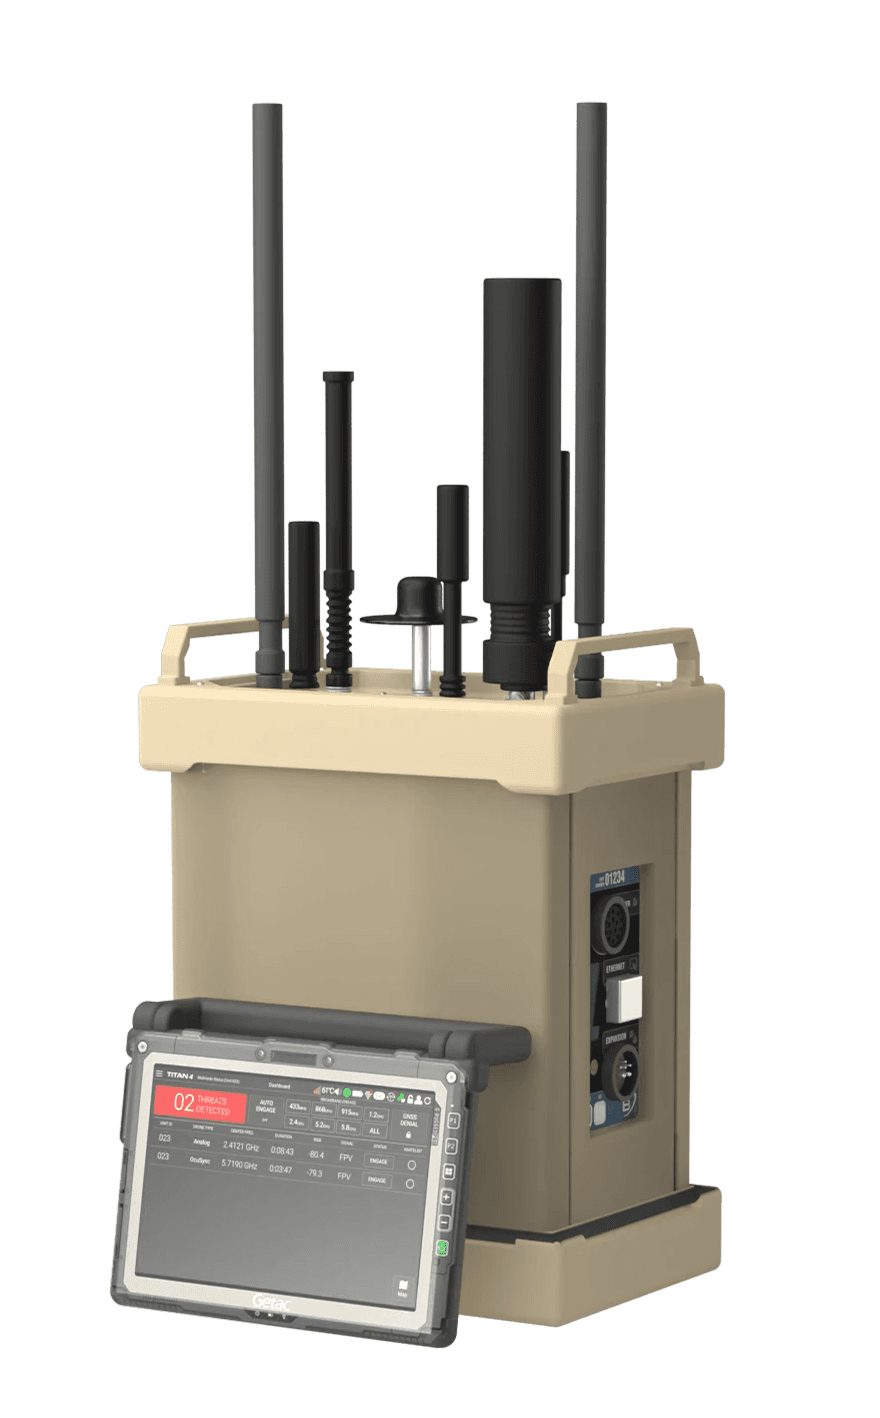
What is Titan C-UAS?™
Titan is an autonomous drone detection and defense system that uses artificial intelligence to detect and safely neutralize aerial threats without causing harm. The latest release, Titan 4, introduced expanded capabilities and additional accessories, which meant the system needed new cases.


THE CHALLENGE
How Not to Break Big Things: Transporting Large Systems 101
This was the first time design was asked to lead end-to-end on the system cases, critical to the Titan 4’s success, projected to generate millions in sales. The brief: design intuitive, mission-ready cases that enable warfighters to deploy the system in under 10 minutes. Each case had to stay under 70 pounds to meet military transport standards.
While stakeholders initially pushed for a single-case design, early weight breakdowns showed it would exceed safe handling limits. We pivoted to a modular approach.
As the only team member with CAD experience, I led the foam layout and drawing work, collaborating closely with my teammate to optimize the case architecture. With the previous Titan 3 cases costing $410 (total ~$820), our design had to hit cost, weight, and usability benchmarks while supporting mission-critical use across multiple defense operations.
THE PRELIMINARY IDEA
Where it all began
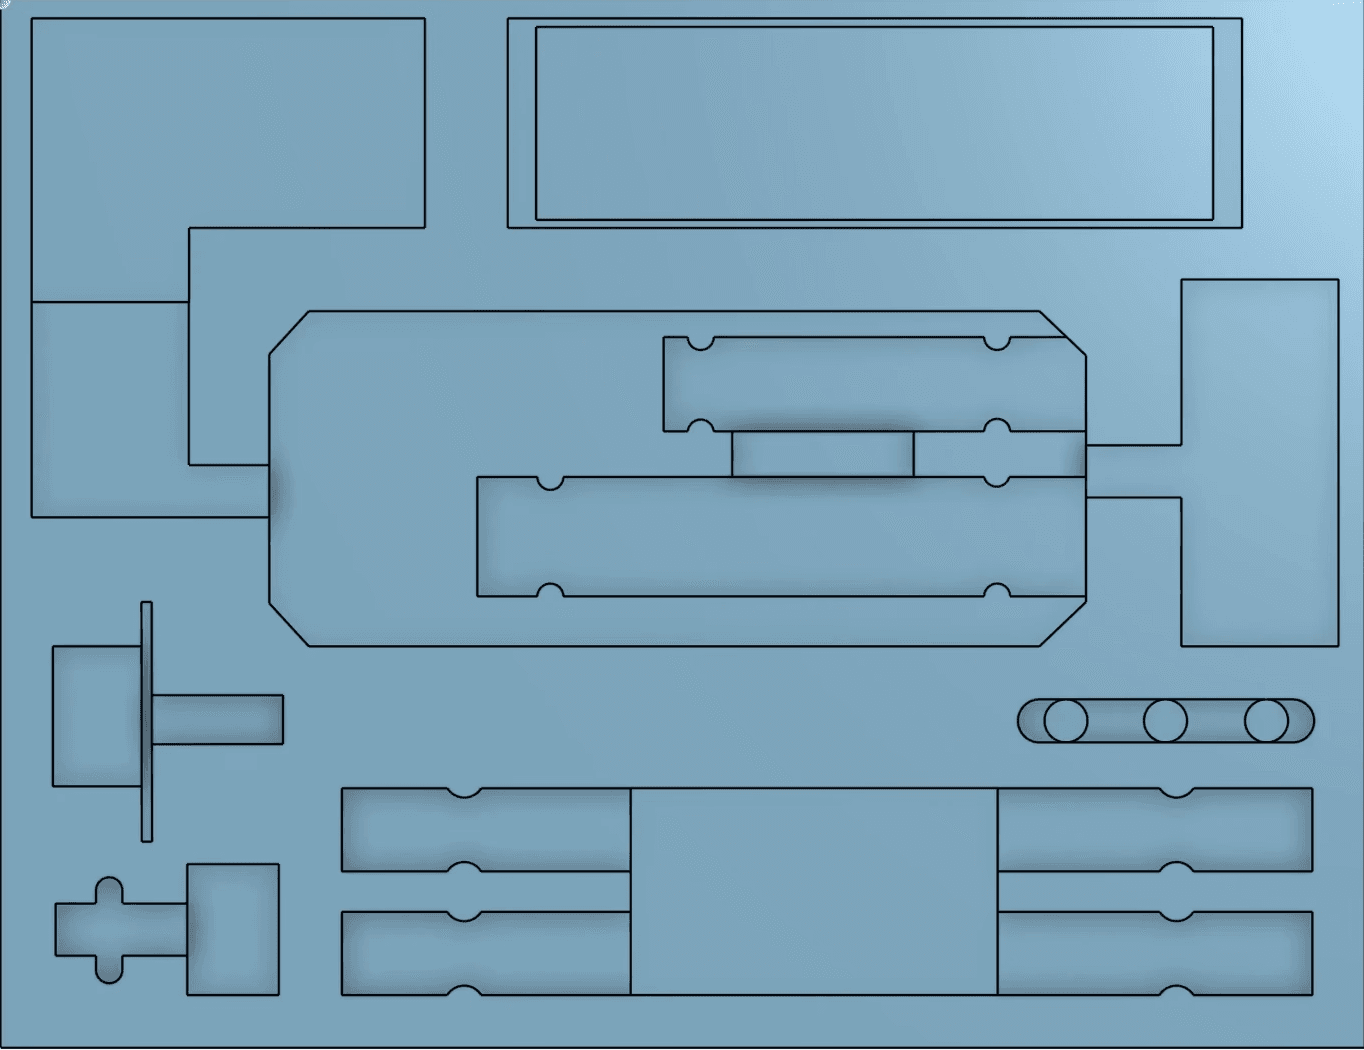
After the initial sketches, it was determined to house limited components in the first case to support the main unit's weight. Case #1 was determined to have the Titan & it's tablet with Case #2 to have the associated accessories.

Case #1
During this phase, we identified a key friction point: integrating a large, heavy accessory into the second case, which required re-optimizing weight distribution. After analyzing user data, I found that only one user group consistently utilized this accessory. I advocated for decoupling it from the base product and offering it as an add-on, enabling stakeholders to streamline the core experience and introduce a new revenue stream through strategic pricing, however this was denied.
outline or previous visualizer
USER RESEARCH
Sometimes you just need to think outside of the box
I had never designed a pelican case or any product casing before, so I began by researching techniques and looking across industries for inspiration. I quickly thought of the makeup industry, specifically how beauty brands design PR packaging for influencers and celebrities. Their packaging consistently prioritizes stability for delicate items while also delivering a fast, seamless unboxing experience and creative ways to incorporate accessibility. I aimed to apply that same balance of protection and user delight to my own approach.


Meanwhile, my teammate and I held several conversations with the mechanical engineers and Head of Engineering to understand the structural requirements and we connected with the Business Development (BD) team to dig into user behaviors, leading to these large takeaways:
The foam structure must protect the power supply from impact
Dense foam is required around the power unit to ensure it remains secure and intact, even if the case is dropped or flipped.
The design must account for inevitable wear and user-induced stress.
Users tend to force parts into place under time pressure, making it essential that the foam resists tearing and handles rough handling.
Simplicity in foam geometry is critical to durability.
Complex cuts create structural weak points; a simpler, more unified design will better withstand repeated use without degrading.
DESIGN #1
Decisions informed by real use
I started by mapping out rough component cavities based on early size estimates and layout needs. Through iterative refinement, I was able to compress the design into a much smaller case than originally expected, minimizing negative space & cutting material costs by over $200. I also introduced an accessibility improvement: a lift-assist feature to help users remove the system easily, addressing a major usability gap in the legacy design.

For the second case, stakeholders emphasized that antenna elements needed to remain easily accessible at the surface. One major challenge was integrating a bulky adapter accessory without compromising layout or usability. We hypothesized a hidden solution, tucking it beneath the components in a discreet canal. My teammate quickly mocked up a prototype using a makeshift box to test fit and feasibility. However, through hands-on testing, we uncovered a key issue: the cord’s limited bend radius caused it to unravel inside the cavity, making retrieval awkward and risking foam damage when users pulled on it. We needed to pivot.
DESIGN #2
When ideas began taking shape
After refining the design, I introduced subtle branding elements and quality-of-life improvements to the first case to enhance the user experience. Key updates included easier access to user materials with a finger notch, an idea from my teammate, and an adjusted tablet cavity that allows the tablet’s handle to lay flush with the case surface, making it quicker and more intuitive to grab and go.

The second case posed unique challenges as many components were still in flux, and exact antenna dimensions weren’t available as leadership was still finalizing accessory decisions. This led to a trial-and-error phase. After collaborating with the Head of Engineering, we introduced an "antenna cabinet" concept, consolidating all antennas into a dedicated zone, which freed up space to house the bulky adapter in its own optimized cavity.
From there, we placed our initial test case order.

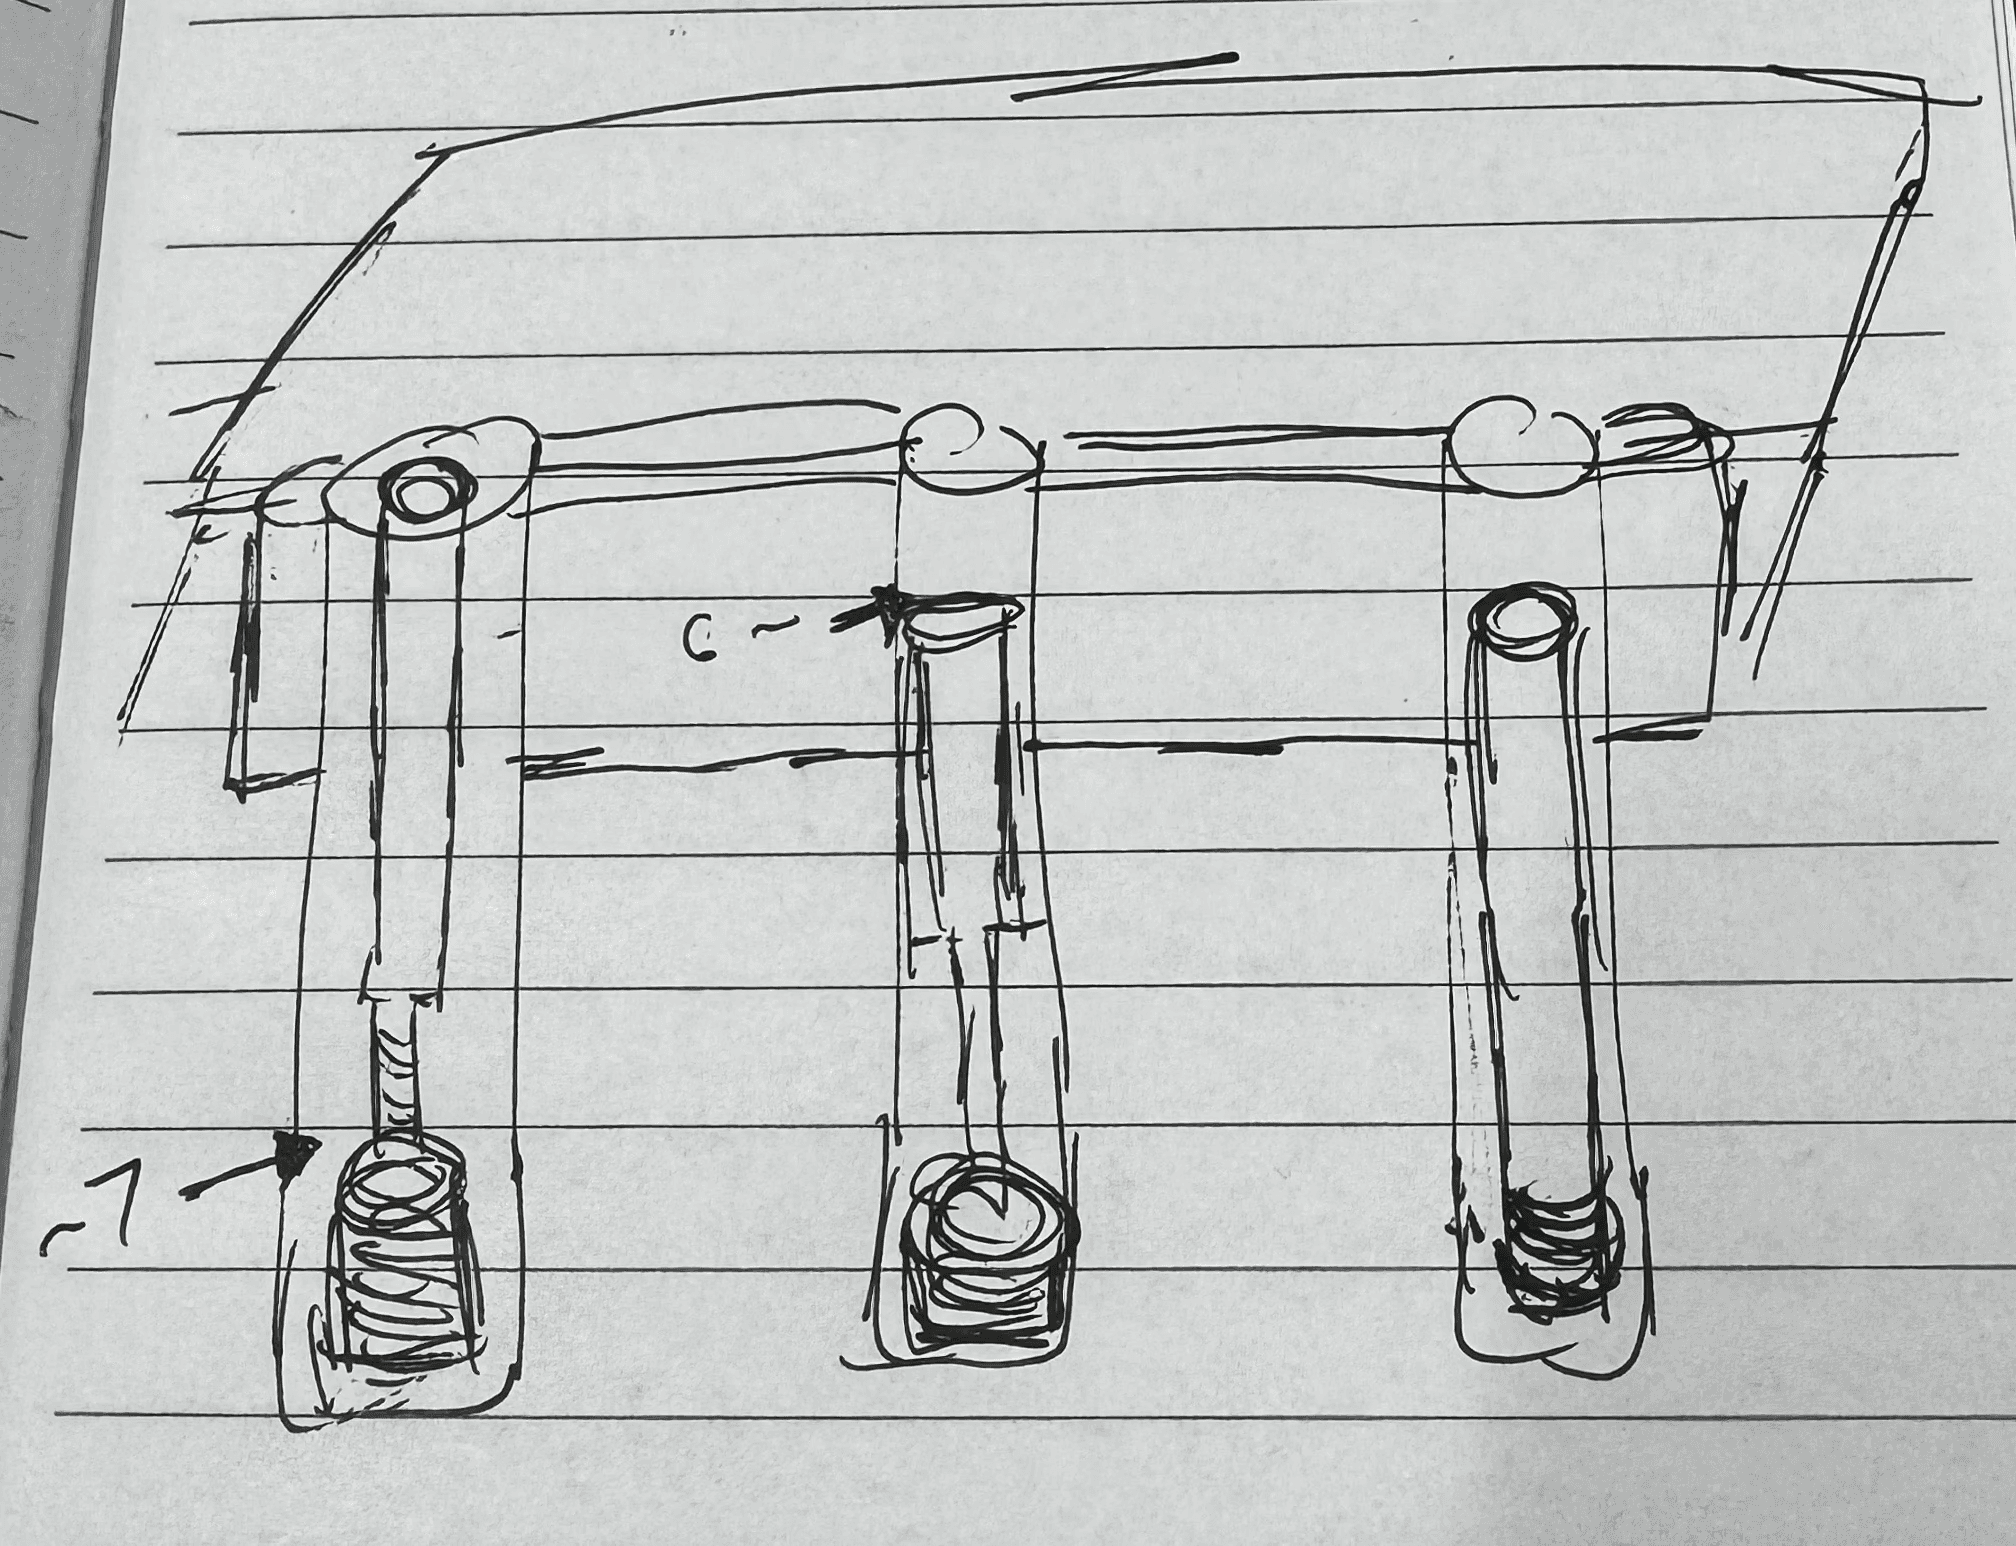
Cutting foam & learning the hard way
The first test items showed potential but needed refinement. With just a week to go, my teammate and I jumped into hands-on prototyping, using a foam cutter to shape supports that would hold each element in place. During testing, especially with the second case, we uncovered a few key issues. The finger holds, added to assist with lifting the antennas, felt off-brand and somewhat comical. A few antennas had also changed in width and no longer fit correctly. These insights pointed to clear opportunities for design optimization.

Case #1
Case #2
With Case #1 nearly finalized, only requiring minor adjustments, our focus quickly turned to Case #2. Stakeholders pushed for a much smaller footprint, noting that Case #1 was nearly half the size. Business development also introduced a new requirement: a “tray-like” design where all antennas would sit on the same surface level.
This feedback led to another strategic pivot. We removed the antenna cabinet entirely. While it was spatially efficient, it wasn’t functional in practice. Our design priorities shifted from optimizing for intuitive workflows to maximizing space efficiency while still enabling fast, reliable assembly within tighter constraints.
DESIGN #4
Rethinking Case #2 from the ground up
With the second case design open for discussion, we seized the opportunity to optimize both layout and functionality. Our key move: placing the heavier antennas beneath the power supply—the heaviest component in the case. While this introduced some negative space on the left, it allowed us to reduce the overall size of the second case.
We commissioned a new batch of test cases to validate component placement. These tests surfaced two critical issues: uncertainty around the smaller antenna positions and unexpected difficulty lifting some of them.
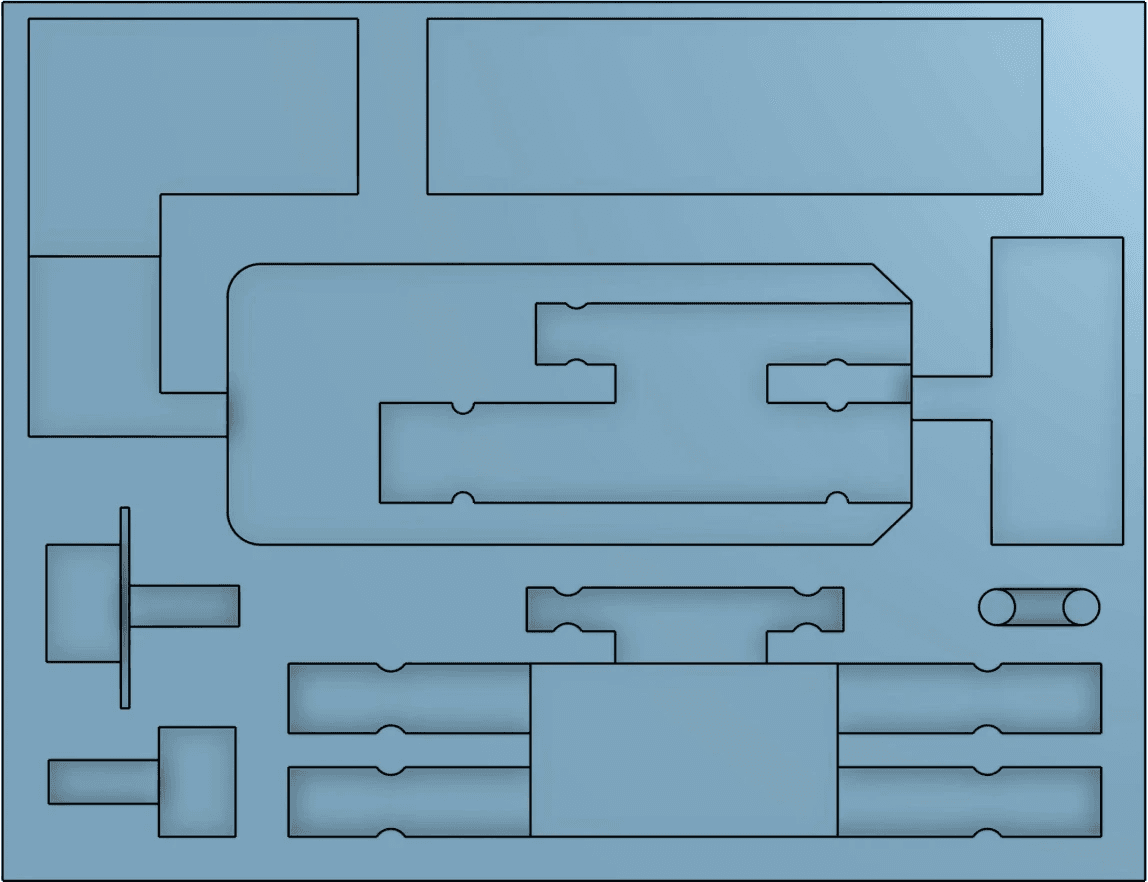
I proposed reformatting the cavities for all smaller antennas with matching diameters, enabling them to fit interchangeably in any slot. This not only simplified the manufacturing process but also improved the user experience, making the antennas easier to access and reducing setup friction.
THE OUTCOME
So what's going on now?
The redesigned cases are now in production for the first batch of Titan 4 systems. During the final design phase, the company was acquired, prompting a strategic pause on branding to ensure long-term alignment, especially important given that the case design is intended to remain unchanged for the foreseeable future.
One late-stage product decision also shaped the outcome: stakeholders opted to sell the adaptor accessory separately. To future-proof the design, I filled its cavity with removable foam, allowing users to easily convert the space for accessory storage if they purchase the adaptor later.
This is a huge accomplishment as I've gotten to experience exhaustive product experience & industrial design through this opportunity and incorporated an unprecedented amount of accessibility in these designs.